Automated
Backing
Up
Table of contents
- Automated
Backing
Up
- Preparing the Installation
- Creating a backup-up
type
- Naming rules
- Include file format
- Exclude file format
- Configuring the
Backup Script
- Destination directory
- Disk full threshold
- Use of compression
- Access by
unprivileged users
- Default backup types
- Incremental clean-up
policy
- Clearing the Print
Queue
- Test for File Existance
- Preparing the Back-Up Device
- How
It
Works
- The Incremental
Creation Process
- The Automated
Clean-up Process
- The Creation of the
Backup Files
- Notes About the
Script Operation
- Preliminary Steps
- Locking Approach
PSC's home page
Preparing the Installation
The script is installed by first unpacking it to some sensible
location
(e.g.
a directory kept just for the backup scripts and configuration
files)
and then editing the *.include and *.exclude files to suit your
usage,
and maybe the pbackup.conf file as well.
If you want, create additional include/exclude files for specific
areas
you want to have back-ups of.
Then install the stuff from a terminal by going to the place you
unpacked the stuff, and using the command sudo ./install.sh
NOTE: The default is not to backup when rebooting, only on shutdown!
You can, of course, change that by the install script, for example
as sudo ./install.sh -R 2
Creating a
backup-up
type
To create a backup "type" you simply create two files, one that
lists
what you want included, and the other what you want excluded that
may
be in the include list. Of course, there is slightly more to this
than
initially meets the eye, so here are the key points:
Naming rules
The 'rules' for acceptable naming for each backup type (such as the
home.include and home.exclude files for type "home") are simply down
to
not contain any spaces or odd characters that the bash shell will be
unhappy with. So the following are OK and different backup types:
mybackup
(normal
lower
case, easy to type)
my_backup
(has
the
underscore character '_', that and the hyphen '-' are fine)
MyBackup
(capitalisation
is
OK and might make it easier to read)
The following are NOT allowed:
.mybackup
(bad,
the
leading period character '.' makes this a hidden file)
my backup (bad, has a
space)
my~backup
(bad,
has
a unusual punctuation character)
Once both the type.include and type.exclude files exist, they can be
used at the command prompt, or added to the default list in the
pbackup.conf file for automated backup when the PC is shut down.
Include file
format
The backup script uses the program tar and
this has the features for including
and
excluding
files by putting the list into other files. However,
there are a number of subtle things that makes this less than ideal,
so
the files you create are processed by the run_pbackup script to
prepare
the files that tar actually will use. The following features apply
the
the files you create:
- You can add comments by starting a line with the # character.
These lines are deleted from the file that tar sees.
- Blank lines are allowed, they are also deleted before tar uses
the data.
- You can have names with "wildcards" such as * and ? that are
expended to a list that tar can use. This makes use of bash's globbing
feature and allows you better control over what you want to
include.
- Names in the include file with spaces in them are converted to
have the wildcard ? in place of the spaces. This is not ideal,
as it
might match stuff you did not want, but it gets round various
problems
that I did not have the time or knowledge to fix in an elegant
manner.
Typically the include file will list directories you want to have
backed up (such as /home)
and
the assumption is that everything below this directory will be
included. But it can also list regular files, if you have a specific
requirement for only certain files to be added to the list.
However, one thing you need to be
aware of is that the script tells tar not
to
cross file systems. This was intended to make it easier to
avoid
the mistake of trying to backup the external backup device, but you
need to consider this when creating the include list. Use the mount
command to see what file systems are used (the ones starting with /dev) and if necessary have each
one
that matters explicitly included in the file.
Exclude file
format
The exclude file is very similar to the include file, but no bash
globbing is used. The program tar is capable of making use of
matching
patters already for exclusion, and this file should follow tar's
rules.
Do not worry if there are exclusion rules that are not present in
the
files found during include parsing, tar will simply ignore them.
Things you might want to exclude are:
- Cache directories (e.g. fire-fox cached images, spotify cache
under WINE)
- Frequently changing status information with little value (e.g.
news group articles)
- Directories with lots of data that is unimportant or easy to
replace (e.g. bit torrent download folder)
Generally, the safe option is to back up everything, but in reality
it
just wastes disk space and shut-down time if you do so. Taking a
careful look at how you use disk space, and how valuable the data
is,
will help a lot.
Also you might want to break valuable data in to different backup
sets.
So you might just exclude email from the "home" backup type, even
though it is important, because you have chosen to include only
email
in another backup type.
Configuring the
Backup Script
The file pbackup.conf has several key settings used by the backup
(and
restore) scripts, and you should take a few minutes to consider them
in
your system.
Destination
directory
The assumption is the user has an external HDD with volume label
"backup_hdd" so it is automatically mounted under Ubuntu as /media/backup_hdd and that this
device as a directory backup
for all of the data to be stored in. Hence the configuration file
has:
BACKUP_DEVICE="/media/backup_hdd/backup"
You can have more than one, separated by a space, so typically the
1st
is your prime backup device (e.g. USB disk or network drive) and the
second, if set, is a fall-back should the first be unavailable
(unmounted, disconnected, swapped for 2nd PC, too full, etc). For
example:
BACKUP_DEVICE="/media/backup_hdd/backup /media/thecus/data"
As for the include/exclude file naming, the path to the backup
location
MUST NOT include spaces or
odd
punctuation!
Disk full
threshold
Decide on a threshold for the disk being too full (percent). This is
needed to allow space for the backup we plan, and to avoid the slow
down as finding free blocks becomes difficult. The default is 85% so
there is a line:
MAX_DISK_USED=85
Use of compression
The choice of compressed (gzip) or uncompressed depends on the data
type, CPU speed, and speed of the backup device. Typically
uncompressed
is much faster (2-3 times) but often only 1.5 times bigger (assuming
bulk of files are media or .pdf that are not very compressible in
any
case). Default is to use compressed (TAR_UNCOMPRESSED=0), but
typically
a first 'full' backup might be done in uncompressed mode from the
command line.
For most cases, compression is useful so the default line has:
TAR_UNCOMPRESSED=0
Access by
unprivileged users
The 'ALLOW_READ' variable controls the permission for those other
than
'root' or the 'adm' group to access to the backup files and their
text
list. If privacy between users is not a significant factor this
allows
easy checking what has been backed up, however, it is a significant
risk in most cases so the default is off:
ALLOW_READ=0
Change to '1' if you want wide access (not recommended).
Default backup
types
There is a defined list of 'types' that are run with the -D option.
This is typically used as the shut-down options to be backed up. For
each 'type' there has to be a corresponding file
$CONF_DIR/type.include
and $CONF_DIR/type.exclude to list what should and should not be
backed
up:
DEFAULT_BACKUP_TYPES="home"
This can be a space separate list with quotes (e.g.
DEFAULT_BACKUP_TYPES="home system")
Incremental
clean-up
policy
Allow user control over the cleaning-up of older backups. Options
are:
0 = Never clean up (needs lots of storage space!)
1 = Long clean up (keep "day/week/month" for 38/68/361 days)
2 = Normal clean up (keep "day/week/month" for 15/38/181 days)
Default option is:
CLEAN_UP_MODE=2
Clearing the Print
Queue
Provide the option to clear the print queue on shut-down. This is
more
in keeping with home use (in particular with children using the
computer) where you don't want the printer bursting in to life with
long-forgotten print jobs when first switched on.
0 = Normal workstation behaviour (print jobs preserved over reboot).
1 = Home use, print jobs cleared on shutdown.
Default option is:
CLEAR_PRINT_QUEUE=0
Test for File
Existance
It may be desirable to prevent the backup from running in cases
where it is likely that one of the targets may be missing. If a
backup runs without a mounted partition, etc, then restoring to that
point in time will result in no files! (Basically the incremental
backup list think all files were deleted then). To prevent this you
can use a file existance test, this is configued by default to:
RUN_IF_PRESENT=""
For example, if your /home directories are on another partiton (not
simply part of the '/' root tree) then you could test for the
lost+found directory being present when that partion is mounted with
RUN_IF_PRESENT="/home/lost+found"
[top]
Preparing the Back-Up
Device
The default assumption is the user has an external HDD, formatted as
ext4
and with volume label
"backup_hdd" so it is automatically mounted under Ubuntu as /media/backup_hdd
If the external drive is formatted NTFS it will be a little
slower under LINUX and lacks permissions to control who can restore
files from other users. If it is formatted FAT32 then it is poorly
protected as well as being limited to 4GB per backup file! The basic
steps for disk formatting
are in the above guide, and if at all possible I would use ext4
Then create a directory which is used for the data archive, for
example
with the command:
sudo mkdir /media/backup_hdd/backup
You can have more than one backup device, as all key data is held on
the backup device. If you swap them say, once per week, then you
will
have two sets of 'complete' backups but with some changes missing
from
each. However, should one device fail, you still have a usable
backup
on the other.
If you prefer to use Network Attached Storage (NAS) then you need to
make sure of the following points:
- The NAS has the correct time, by NTP if possible, as file
timestamps matter here.
- The NAS allows root access and provides some form of
read/write
protection. If not (e.g. if root is mapped to 'nobody' for
network
security) you may have consider an encrypted volume and hope no
one
deletes it!
- The NAS should be configured to mount automatically on
boot-up,
and should not be unmounted before the backup script is run.
With my
home PC and Thecus N5200 using NFS, this worked fine.
[top]
How
It
Works
Most computers have a lot of "old" data, stuff that has not changed
for
a long time. For those files you really only need the one backup
copy.
For any file that changes, the efficient thing to do is to store the
changes, so you backup the original set plus the changes with time.
There are various ways of doing this, and the script tries to create
such an incremental backup (i.e. only the changes)
according to the time between them. It also tried to arrange and
manage
this process so it is robust and automatic.
The Incremental
Creation Process
Initially it is created with everything as a "full" backup (level
0).
Then next time if less than 7 days from the previous backup level
then
the
mode is a "day" backup, if 7-29 days then it is created as a "week"
backup, if 30-179 days then a "month", and beyond that it is a
"major"
backup.
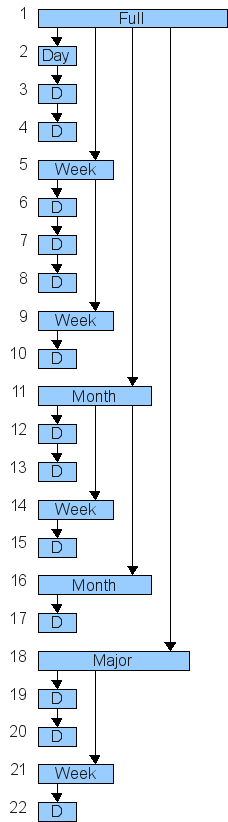
To illustrate this the diagram shows the creation steps (but with
some
big jumps in time):
Step 1 is the full backup, it becomes the starting point for all
other
levels. Then steps 2-4 show daily changes being recorded as a change
from day-to-day. Step 5 shows a weekly backup being made, starting
again from the step 1 full backup, this in turn becomes the starting
point for the next daily backup of step 6, and later for the next
weekly backup of step 9.
Step 11 shows the first monthly backup being made, again starting
from
step 1's full backup point, and in turn becoming the starting point
for
the next daily and weekly, and later monthly points of steps 12-17.
The major backup of step 18 is just the same thing, it becomes the
point for the process to repeat again, shown by steps 19-22.
The advantage of having different backup modes (i.e. levels) is the
quicker path to restoring everything. To restore to a given point in
time, you follow the "outer path" that created the chosen point in
time.
For example, to restore to step 22 you would do the following
sequence:
1→18→21→22,
where
as to restore to step 17 you would do: 1→11→16→17
Without such a hierarchy the process of restoring to step 22 would
involve going through all 22 incremental steps, a much more tedious
process.
The Automated
Clean-up Process
The significance of the major backup is when it comes to the
automated
tidy-up process, this deletes incremental backups once they are
significantly out of date (and probably incorporated in to higher
backup levels). Without such a step the volume of data would grow
significantly with time, as every change to the system is stored.
That can be an attractive mode, as you can then always go back, but
it
also demands a significantly larger storage device to match it!
The deletion process is based on the time of the last
successful backup of a given 'type' (e.g. "home" and so on), and it
works backwards from there. For example, all daily backups of the
same
type older than 15 days after the last successful backup of that
type
are removed, as are weekly backups older then 38 days, and monthly
older than 181 days.
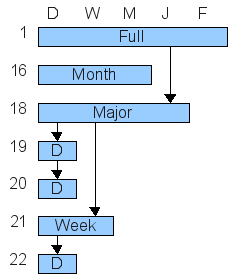
Full and major backup points are never removed. Once this process is
completed, any empty date-time directories are
removed to clean up the storage device.
An example of what you are left with is shown here:
In this case, only the most recent sets are available, reducing the
necessary storage volume. However, it is now only possible to fully
restore to steps 1 or 18-22.
Step 16 is available, but not with its
full history, so although you can recover some files from that point
in
time, you cannot restore a whole consistent system to then. For
example, changes to files (or new files) between steps 11 to 16 can
be
recovered, but not any changes/additions between 1 and 11.
The use of the last successful backup point for the time reference
has
a significant advantage: you do not remove data from a new or reused
storage device until you have at least succeeded in the automated
process.
The Creation of
the
Backup Files
The script makes a lot of use of temporary files so the system is
robust against an unexpected stop (e.g. power off or HDD removed
during
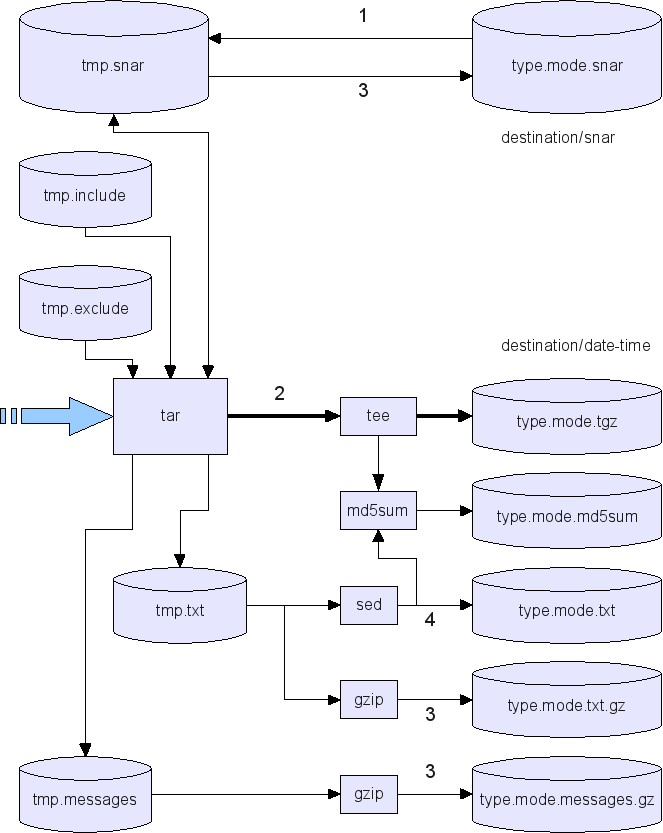
the back-up process). The main process is shown in this diagram:
Step 1 is the preparation of the control files for tar (from tape archive, the backup program used
here). These are cleaned-up copies of the type.include and
type.exclude
files, and the last incremental state file for that type and mode
(e.g.
home.week.snar for type=home and the weekly backup mode). The
cleaning
up include stripping out any comment and odd spaces, and expanding
any
.include file "wildcards" such as /home/* in to /home/paul etc.
Step 2 is the time consuming process of actually getting the changed
data off the disk and writing it to the output file (usually
gzip-compressed, hence shown as .tgz above). The odd complication
here
is the data is split in to two streams using the tee program and the 2nd copy is
fed
to the MD5 checksum program. This allows reliable testing of stored
data for errors, and by doing it before it goes to disk it is both
faster and can test for errors during writing.
Step 3 is done after the archive is written, and that includes
copying
the messages to the date-time directory and copying back the
incremental status file.
Finally, step 4 is the writing of the type.mode.txt file that has
the
listing of stored files. This serves two functions:
- The first is to speed up searches for where an file might be
stored.
- The second is to signify that the archive is now complete and
safely committed.
Each "type" of backup is run in sequence, it is simpler that way and
normally faster as you can write sequentially to the backup device
(often a slow external USB disk, etc).
[top]
Notes About the
Script Operation
Preliminary Steps
The first thing the back-up script performs is the sync command to ensure
the
file systems are flushed to disk promptly. The rational here is the
users has initiated a shut-down which is why this script is being
run,
and thus is likely to power off without checking for completion.
This
step buys a little extra margin for clean file system state if they
do.
Then the script initialises the default values for the configurable
settings, then loads the user settings from
/etc/pbackup/pbackup.conf which, if OK, will override the
defaults.
The script gets the current date/time as this will be used for
creating
'unique' and sortable directory names for holding all backups
performed
in this one request (i.e. you could have the script running several
backup types on shut-down for home, email, etc). While this only has
1
second resolution, it is still sufficient for all practical usage of
the script.
Locking Approach
Before proceeding the script looks for another instance of itself
running. It works by compating the PID list of all processes with
its own name with its own PID, if they match exactly there is only
one running.
[top]
(c) Paul Crawford, 31st Jul 2014